Settings User Documentation
| Purpose | This manual is designed to provide users with an easy-to-follow guide on how to effectively utilize RAVEN settings. Our aim is to equip users with the necessary knowledge to facilitate a smooth learning and adaptation process. |
|---|
| Created | Sept. 13 2023 |
|---|
To access the Raven portal, the company will setup your account and send you two emails. The first email is an invitation to the team, and the second emails allows you to reset your password. After having access to the portal the user will be able to edit information about their account, what and how to edit different information will be explained in the following documentation.
Inside the RAVEN Settings, there are two distinct options that we will discuss in this document:
-
Account
-
Team
About My Account:
Within Account settings, you can update or interact with the following information:
not all users have the ability to modify account aspects, this depends on the assigned role
-
Full name
-
Role in team (role dependent)
-
Time zone
-
Avatar
-
Password
-
Two Factor Authentication
-
API Tokens
-
Elevated Rights
-
Active Sessions
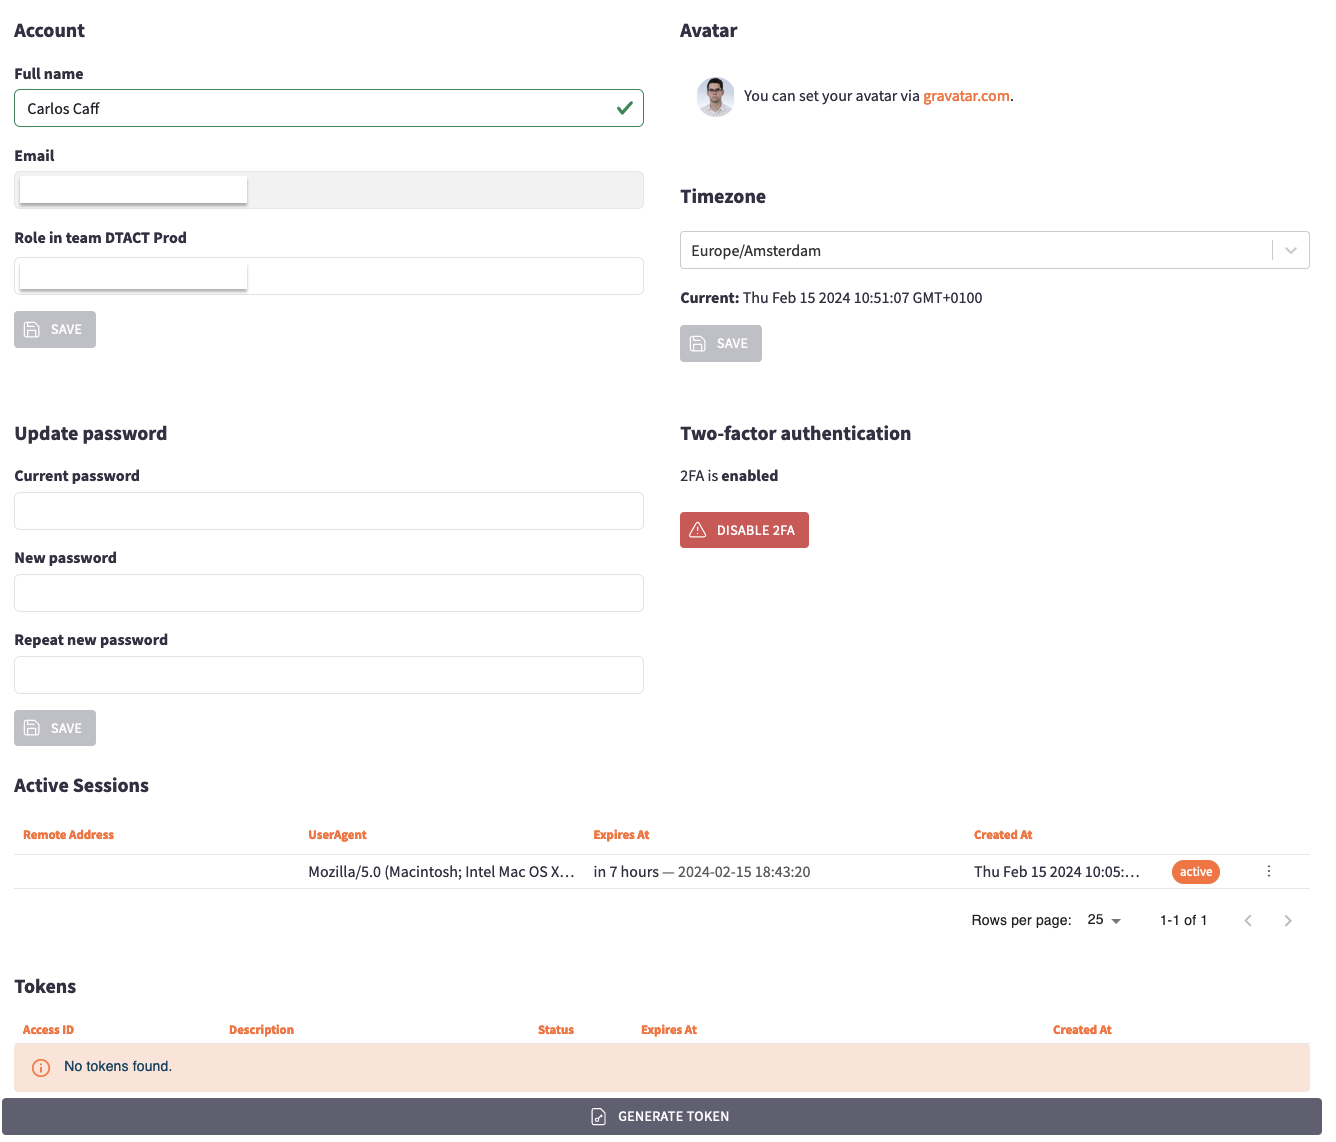
Save changes:
To save any changes to your full name, role in the team, time zone or password simply press the "Save Button".
Set-up Avatar:
If desired the user can add an avatar or picture to the profile through "gravatar". Gravatar allows users to create an avatar that can be associated with their email address. This avatar will then automatically appear on supported platforms where the user has used the associated email address. It offers a convenient way to maintain a consistent online identity across multiple websites and services. If the user needs to set up an avatar, follow these steps:
A. To set up an avatar, click on gravatar.com located in the top right corner. This will open a new tab where you can sign up with your email.
B. After signing up you will receive a confirmation email that will redirect you to the gravatar.com web page to upload your desired avatar or picture.
C. After uploading your avatar on 'gravatar,' you will be presented with various rating options. Choose the appropriate rating from 'G-rated' to 'X-rated.' These ratings correspond to the content's level of appropriateness; please ensure that the uploaded avatar does not include any profanity or sexual imagery.
D. Refresh the "Raven Portal", and your avatar will appear.
Password:
Inside this section the user will be able to change their current password.
Follow these steps for successfully changing your password:
-
Fill in your current password.
-
Create a new password.
The password should be a minimum of 8 characters long.
The password should contain a number, a letter, a capital letter, and a special character.
-
Repeat new password.
-
Press the "save" button to make sure changes are kept.
Two Factor Authentication(2FA):
Two-Factor Authentication (2FA) serves as a crucial security measure for protecting both your personal and business assets. In simpler terms, it is a method to confirm the user's identity using an additional layer of authentication, beyond just a password. Various software options are available for implementing 2FA like:
-
AUTHY
-
Google Authenticator
Follow these steps to set up 2FA:
A. Install a 2FA Authenticator app such as Authy or Google Authenticator on your device.
B. Scan the provided QR code or enter the set-up key provided.
API Tokens
API Tokens are used for authentication, for example if the user wants to query the data from Raven with an external program like python, powerBI, or any other application, these tokens are used to authenticate the request.
To create a Token just click on the "generate token" button, add a description and save it.
not all users have the ability to create tokens, this is based on the assigned role.
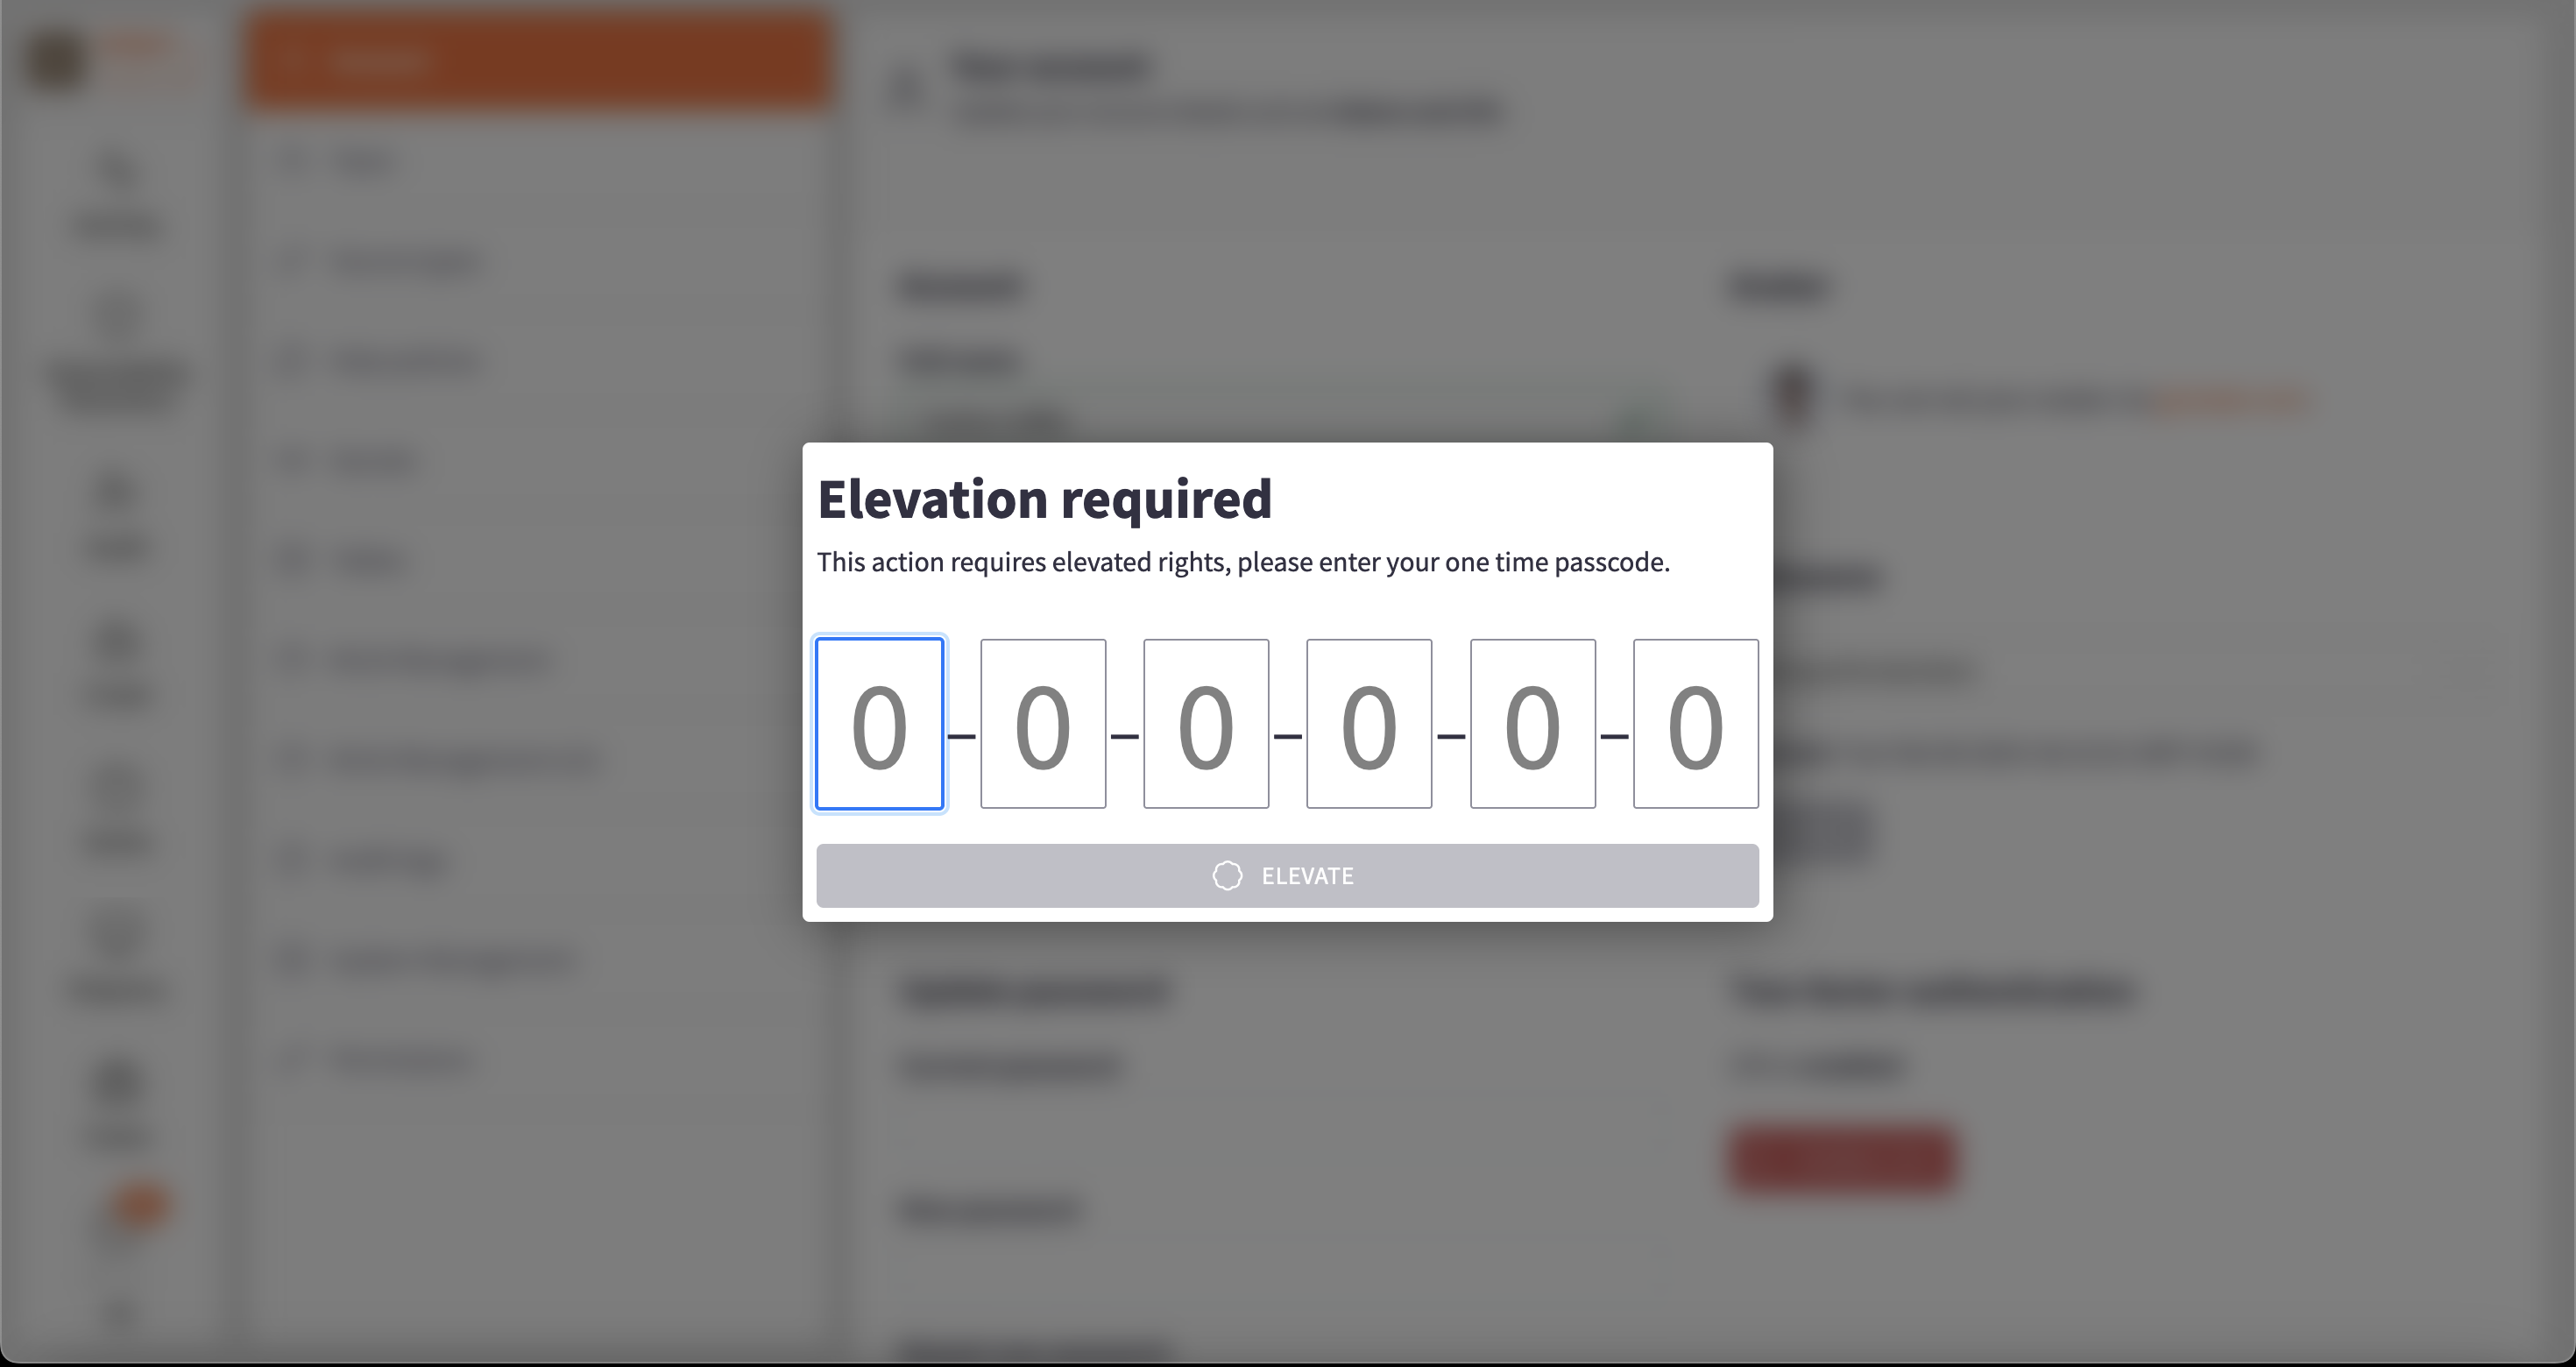
Elevated Rights
Depending on the task you need to fulfill within the platform, you may require "Elevated Rights" beyond your standard permissions.
This elevated permissions lets the user access different functionalities and configurations around the platform, adding a level of security to protect your personal and business assets.
Note that the "Elevated Rights" asked in the Raven Portal to perfom specific actions is the code provided by the 2FA software in use by the client.
Example of how the platform requests the elevated rights code:
Active Sessions
In this portion of the Account section you will be able to see all the sessions you have active with your account.
More specifically it will show:
-
Remote Address: Network address or server from which your account is being accessed
-
UserAgent: Type of web browser and operating system being used to access your account
-
Expires At: Time remaining for your active sessions to expire
All active sessions have a maximum duration of 7 hours before automatically logging out, asking you to reintroduce your credentials.
- Created At: Date of when the session started
lastly, you also have the right to revoke a session if needed by clicking on the three dotted button located at the far right corner of each session information.
Team
To be able to navigate through the portal you will need to be part of a team, which will be assigned to the user by the organization, this will let the user collaborate with different people.
A. In this section of the portal, users can access information about each team member, including their name, role, email and last log-in. Additionally, pending invitations are displayed below the team information.
B. By Clicking on a team member all their information will be deployed. On top of that you will be able to edit the user (full name and role in the team) and lastly remove the user from the team.
C. Looking at the top right corner the user will see four buttons:
-
Create Additional Team (role dependent)
-
Invite User (role dependent)
-
Edit Team
-
Switch Teams
These will be discussed in this part of the session.
Create Additional Team:
To create a new team click on the "Create Additional Team". This will pop a window in which you will be able to:
-
Name the team.
-
Add the apps needed for a team such as: Brick Management, Raven Portal, Crawl, Views, Alerts, Cases, Playbooks, etc.
Invite Users:
To add users to your team, follow these steps:
A. Click on the "Invite User" located at the top right corner.
B. Enter the email address of the person you wish to invite and select their role.
C. Send invite.
When inviting a new user to the team, allow 15 minutes for the email to arrive, if the invited user has not received the email after this given time check SPAM folder.
Edit team:
By clicking the "Edit Team" button the user will be able to manage two things.
-
Edit the team's name.
-
Add or delete apps such as: Brick Management, Raven Portal, Crawl, Views, Alerts, Cases, Playbooks, etc.
Switch teams:
If you are a member of multiple teams, you can easily navigate between them by following on of these two options:
A. Click "Switch Team" at the top right corner, next to the "Invite User" button, this will open a menu deploying all the teams you are part of. You can select the desired team from the menu.
B. At the upper section of the apps column, you will find the name of the team and user. Clicking on it will open a window that allows the user to switch between teams.