Flows User Documentation
| Purpose | This guide will provide you with crucial insights into the Flow app available through the Raven Portal. Within the various sections of this manual, you'll discover what Flows are and how to create and configure them effectively. |
|---|
| Last Updated | July 29, 2024 |
|---|
What are Flows
Raven Flows is an app that helps users to perform Extract, Transform, and Load (ETL) operations on events.
In simpler terms, the Flows App uses different kinds of Bricks which help the user import data into the Flows, modify this data (filter, add more data, perform mathematical equations, etc), and take action with the results or output of the data like sending a message, triggering alert, etc.
Users can create custom Flows by connecting individual Bricks.
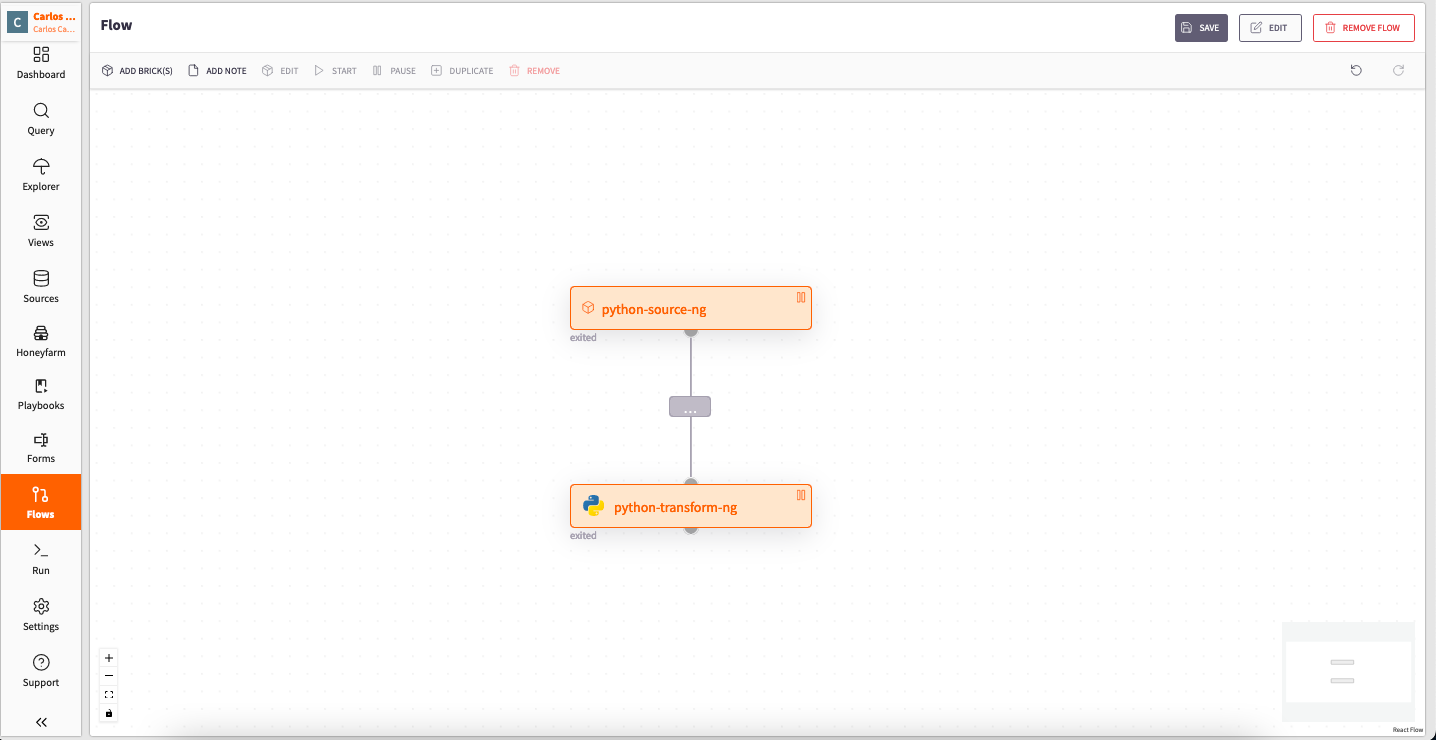
Flow example
Adding a new Flow
To create a new Flow, click the "Add Flow" button located at the top left corner.This will take you to a new window, where we will be able to add some configurations to the flow including:
-
Detail: This section allows you to add a name and description to the flow
-
Owner: By default, it displays the user who created the flow and enables you to select a new owner.
the owner receives information, warning, and error notifications related to the Flow
-
Teams: This section allows you to specify which teams have access to the flow. You can only select teams of which you are a member
After adding the necessary information select the CREATE button at the bottom of the pane, and there you have it, you have created your first flow.
After editing a Flow the user must press the "Save" button, if this action is not taken the changes will not be saved.
Removing a Flow
To delete a Flow, press the "Remove Flow" button. A confirmation message will appear; press "delete" to proceed.
What are Bricks within Flows?
In Raven Flows, a brick is a fundamental building block that performs specific tasks for event processing. Bricks can be chained together to create a pipeline for the event processing.
Each brick has its own configuration options, allowing users to customize its behavior.
Key information about flow bricks:
Each Brick performs a single task.
Bricks are isolated and secure.
Raven orchestrates and scales Bricks.
Bricks can run in two different ways:
Automatically: This means that the Brick will start running when there is a queue of data or message queue. This are digital pipelines that allow different computer programs to send and receive messages, enabling them to communicate and work together efficiently. They ensure messages are delivered when both programs are ready, promoting smooth and independent operation.
On schedule
Types of Bricks within Flows
Within Flows Raven offers different types of Bricks depending on the users specific needs.
These are:
-
Source Bricks
-
Transform Bricks
-
Execute Bricks
- Source: This Bricks are endpoint from where you can retrieve data. It can be used in multiple Flows to fetch data from various sources.This endpoint can be a URL, a database, or any other data source that can be accessed through an API or some other data retrieval mechanism.
There are two ways to retrieve data from a Source-Brick:
-
Push: you can send data to a Source Brick using its block-id This is useful when you have data that you want to send to the source for processing or storage.
-
Pull: the Source Brick can pull data from the endpoint by itself. This can be useful when you want to periodically fetch data from the endpoint at specific intervals.
To create a Source Brick, you need to specify the endpoint from where you want to fetch data. The endpoint can be a URL, a database, or any other data source that can be accessed through an API or some other data retrieval mechanism.
To build a Flow the user starts by adding a Source Brick, which can be created and configured at the "Sources" menu.
This Bricks can only be used to send data.
-
Transform: are used to modify, enrich and transform data.
This Bricks can receive and send data.
-
Execute: are tasks that are performed within the Flow. They can be anything from sending an email to making an API call.
This Bricks can only receive data.
One really important and innovative feature that raven provides is "Scripting Bricks". This means that the user can use code to configure their own bricks.
Scripting Bricks are used in Python or TypeScript, to port existing scripts inside your organization easily into Raven. Your scripts will run directly inside of a flow, integrating the code you already have inside of a high-performance workflow. Scripts can be be used directly inside Raven, or via link to an external script.
Scripting Bricks support two languages:
Python: for more information follow the link
Scripting Bricks in PythonTypeScript: for more information follow the link
Scripting Bricks in TypeScript
For Scripting Bricks the Raven portal utilizes serialization.
When a Brick sends a message, it includes some data called payload. Think of this payload as a bundle of information, usually organized like a dictionary. To send this data over communication channels, like a topic, we need to convert it into a format that can be easily stored. Most of the time, we use a format called JSON to do this. It's like packaging the data in a way that others can understand.
So, when you have a standard dictionary and you want to use JSON, you can use a built-in method that's kind of like this:
Examples of Source Bricks
Http-endpoint
The HTTPS endpoint in Raven lets you bring in data. It can understand different ways data is written, like JSON and XML. If you tell it what kind of data you're sending by saying 'JSON' or 'XML' in a special way, it will make sure that data is written correctly.
-
Example config of cURL with JSON validation:
 curl --header "Content-Type: application/json" \
  --request POST \
  --data '{"datafield1":"xyz","datafield2":"xyz"}' \
  https://a88a7cf4-1446-4985-b79a-3a92b669c8de.ingest.dtact.com
Upload large multi-line JSON:
curl -H "Content-Type: application/json" -T ./results.json https://a88a7cf4-1446-4985-b79a-3a92b669c8de.ingest.dtact.comExample multi-line JSON:
cat ~/Downloads/exampleFile.json|jq '.Records[2000:2500][]'| \
curl -X POST -H "Content-Type: application/json" \
--data-binary @- "a88a7cf4-1446-4985-b79a-3a92b669c8de.ingest.dtact.com"
Example cURL with a XML-file:
curl -vv -X POST
-H 'Content-Type: application/xml'
--data @/tmp/nmap_example.xml
-k https://a88a7cf4-1446-4985-b79a-3a92b669c8de.ingest.dtact.com:443/
Example config of cURL with XML validation:
 curl --header "Content-Type: application/xml" \
  --request POST \
  --data '
  <?xml version="1.0" encoding="UTF-8"?>
  <note>
  <to>Brian</to>
  <from>Jani</from>
  <heading>Reminder</heading>
  <body>Hello World!</body>
  </note> ' \
  https://a88a7cf4-1446-4985-b79a-3a92b669c8de.ingest.dtact.com
Sending files to the HTTPS endpoint:
curl -T file.bin https://a88a7cf4-1446-4985-b79a-3a92b669c8de.ingest.dtact.com
Filebeat-endpoint
Filebeat is a lightweight tool that helps you keep an eye on log files, collect them, and send them to their destination.
When you have Filebeat installed as an agent on your servers, you can tell it where to find log files you want to send. Filebeat will carefully watch these locations for new log data and then efficiently send it to Raven.
What's more, Filebeat is super flexible. It already knows how to handle many common log formats, like those used by Apache, MySQL, NGINX, and more. If you want to get even fancier, you can set up your own custom paths.
For more information on these modules follow link below:
Learn more about official Filebeat modules.
For more information on setting up your own custom paths follow link below:
Learn more about custom paths configuration.
For more information on dowloading and installing Filebeat follow link below:
Configuration:
As Raven is compatible with Logstash for data ingestion, you have the option to transmit data from Filebeat to Raven by configuring Filebeat to utilize the integrated Logstash output.
Example on how to configure the transmission of data from Filebeat to Raven:
#=========================== Filebeat inputs =============================
filebeat.inputs:
- type: log
  enabled: true
  paths:
    - /var/log/*.log

#============================= Filebeat modules ===============================
filebeat.config.modules:
  # Glob pattern for configuration loading
  path: ${path.config}/modules.d/*.yml
  # Set to true to enable config reloading
  reload.enabled: false
  # Period on which files under path should be checked for changes
  #reload.period: 10s

#================================ Outputs =====================================
# Configure what output to use when sending the data collected by the beat.
output.logstash:
  hosts: ["25ffeb61-a19d-4f7c-bff2-dfca65e26a0a.ingest.dtact.com:5044"]
  ssl.enabled: true
S3-source
Is an object storage on AWS, this source Brick takes the data from the storage and pulls it into the Flow.
To configure this Brick some information about the particular S3 will have to be filled.
Python-source-ng
This Brick establishes a connection between a data source and the Python language. In essence, it enables you to retrieve data from a source by writing Python code while also allowing you to specify the parameters for data extraction.
Creating and Configuring a Brick
To set up a Brick, the user has tow options:
-
Double-click on the brick itself. This action will open a tab containing various menus. Navigate to the "CONFIG" menu.
-
Click the Brick once and then press on the edit button at the top right corner.
Depending on the Brick type the configuration menu will show different aspects for the user to set-up
Adding a Brick to the Flow
To add a Brick within the flow, press the "Add Brick(s)" button at the left top corner and select the desired Brick.
You can check the Brick status just by checking the color it has:
-Green: Running
-Orange: Paused
-Red: Errored Brick
-Grey: the Brick does not has a status yet, is not configured or saved.
Following the addition of the Brick you can interact with it. Below the flow's name there are a few buttons which let you manage or interact with the Brick. These buttons are:
-
ADD NOTE: Lets the user add a note.
ADD NOTE is the name of the Brick.
-
EDIT: Opens up a tab in which you can access different information about the Brick such as:
-
Data: Shows the user the data that is being sent through the Brick in real time
-
Logs: Shows the standard output of the Brick meaning any information that the Brick produces will be shown here
Logs come in handy for debugging since it shows the user the Brick's information.
-
History: Shows the state of the Brick, and what has happened with it. If it had an error and had to restart running it will show here
-
Configuration: Lets you setup the different parameters of the Brick
-
Schedule: Function used for periodic event processing. You can set up the Brick to run every hour, day, week or month
-
Data policy: Tells how many days the data in the Brick is going to be stored. To create a Data retention policy select "Settings", navigate to the "Data Policies" section and select the "ADD DATA POLICY" located at the upper right corner.
If you attach a Data policy, ensure that all Bricks have it configured. If the first Brick has the policy but the second one does not, the information will remain stored in the second Brick.
-
Notes: add notes to show description and/or purpose of the Brick
-
Help: Contains any useful information on the Brick in use
The user can also edit the Brick by performing a double click action on it.
-
START: Runs the Brick
-
Pause: Stops the Brick
-
Duplicate: Gives the user an exact replica of the Brick
-
REMOVE: Deletes the Brick
To keep the changes made in the Flow, the user must save the Flow; if not, any changes will be lost.
Brick Inspector
Bricks added to the flow have a function called Brick Inspector which you can open by selecting a Brick.
A pane will open on the right side showing you:
-
The Brick's name
-
The Brick's ID
-
The Brick's status: shows three aspects
-
Scaling
-
If there has been any errors while running the Brick.
-
How many times has the Brick ran
-
-
The Bricks total messages
-
The Bricks active state
-
The Bricks last event: The most recent occurrence of an event
-
The Bricks executor: Refers to the backend process which is running the Brick.
For users, this might not hold much relevance as it's a feature inherited from a previous version of the portal.
-
The Bricks error: Provides the user information regarding the error and what was the cause behind it
How to connect Bricks
Once you've configured a Brick, establish a connection by clicking on the output from the source and dragging the arrow to the new Brick.
You can create multiple connections to different Bricks using this method. Repeat these steps to add more Bricks to the configuration.
Sharing Bricks between teams
This action can be taken depending on the role and permissions given to the user.
To provide access to a Brick for new teams, you can follow these steps:
- Navigate to "Settings" and access the "Brick Management" section.
- Inside the "Brick Management" section, you will see a list of Bricks. Choose the specific Brick you want to configure by clicking on it. This action will open a tab displaying the Brick's description, version, and permissions.
- In the tab, select the "Permissions" section. Here, you can manage the teams that will have access to the Brick.
Users can only select teams of which they are members.
Brick Manager
Brick Manager at the moment is internal, which means is not available for users since it is still being documented and still a work in progress.
In this section of the portal, you can oversee Bricks.
To access the "Brick Manager," users should follow these steps:
- Navigate to "Settings."
- Click on the "Brick Manager" section.
This action will open a tab where you can view the following information about each Brick:
- Name
- Description
- Brick type
- Brick version
- Last update date
Depending on the user's role, they may have the ability to configure and select secrets to add to the bricks. This capability allows for fine-grained control over Brick customization and security.
Additionally, you have the option to add a new Brick by clicking the "ADD BRICK" button located in the top-right corner. This will open a tab asking users to provide a name, description and base Brick wanted.
Brick ownership
Bricks are shared, which means they are accessible to any team. However, please note that the process of adding Bricks to a team is handled on the backend, so users cannot directly add Bricks to the different teams themselves.